Watermelon Jello Shots

My group of friends is famous for vodka gummy bears and I’ve even seen champagne gummy bears (#adult) popping up recently. But I’ve never been so obsessed with jello shots. Especially at parties. I’m sure you’ve seen jello (shots) in almost every mold imaginable.

Summer cookouts are my favorite type of party. And being that every minute detail of a party needs to be theme-related in my house, I decided to take on the task of making Watermelon Jello Shots for our Fourth of July Cookout coming up this weekend, but really these are perfect for any summertime party. This recipe is similar to that of a DIY-project – concentration and dedication are necessary!

Watermelon Jello Shots

I made a test batch to see if this would actually work. And it did! The most-time consuming part of these is de-pulping the limes, and that can be done a day ahead of time. Actually, you could even do up through step 5 a day ahead of time, and then the jello has longer to harden in the refrigerator. Not to mention, they’re totally adorable and worth it.

Watermelon Jello Shots

  • Servings: 40
  • Difficulty: hard
  • Print

Ingredients:
10 limes
1 box watermelon jello (or any red flavor you like)
1 cup water
1.5 cup cold vodka (use watermelon if you have it)

Directions:
1. Boil 1 cup of water.

2. Halve the limes, using a paring knife cut around the edges to loosen the pulp. Juice your limes, so that you can at least have fresh lime juice instead of wasting all of the pulp. Using your fingers try to pry out as much of the pulp as possible. I found a small spoon under warm running water helped with this. Be gentle – you don’t want to puncture the lime. Re-shape them if they lost shape during the de-pulping. Set the lime halves aside. If you have the time, pop them in the freezer so that when you pour the jello in, they hold their shape.

3.  Add 1 cup of boiling water to the jello powder, and stir for 2 minutes until fully dissolved. Stir in 1.5 cups cold vodka.

4.  Pour the mixture into the lime halves, filling all the way to the top.

5. Chill the jello limes for at least 2 hours, making sure they stay upright.

(Note: De-pulping the limes is the most time-consuming and you can do that part, as well as fill the lime halves with jello to chill, a day prior if you want.)


6. Once firm, use a very sharp knife to cut the lime halves in half (2 wedges per half)

*Some limes will puncture and some will not cut as planned, but I ended up making a small batch of these for aesthetics and having another batch of regular jello shots on hand. Your call.

Super Bowl: DIY Flatbread BAR

As I’ve mentioned before, leftovers are not my thing. But so as not to waste food, I try my hardest to transform the leftovers into something new. Recently after a party, we had a ton of leftover shredded buffalo chicken and meatballs. And what’s one to do with leftover shredded chicken and  meatballs? Well, make flatbreads out of them of course!

Most of the additional ingredients were things I had in the fridge, so this made for a very very inexpensive and tasty meal {neverbeenso tasty!} And because these were so good, I plan on including them in my Superbowl lineup! I recommend incorporating these into a DIY Flatbread Bar and provide the ingredients for people to make their own! The recipes I used are below!

Will doesn’t share my love of blue cheese, in fact he hates it. So I made two buffalo chicken flatbreads (one with the funk and one topped with avocado – which I also ate). And a meatball flatbread. But you can really throw together whatever you want! Get creative!

IMG_3651

IMG_3652

IMG_3653

IMG_3654

Buffalo Chicken and Meatball Mozz Flatbreads

  • Servings: 4-8
  • Difficulty: easy
  • Print

Ingredients
4 ready-made flatbreads

Buffalo Chicken:

2 cups leftover buffalo chicken, shredded
2 tablespoon blue cheese, crumbled
1/2 avocado, sliced
2 cup shredded mozzarella (or any  melting cheese)
2 tablespoon ranch dressing

Meatball Mozz (makes 2):

2 cup leftover meatballs with sauce, chopped
1 cup spinach, chopped
2 cups shredded mozzarella

Directions
1. Preheat oven to 400 degrees.
2.  Spread flatbreads out on a foil lined, oiled baking sheet.
3.  Layer toppings on flatbreads.
4. Bake for 12-15 minutes.
5. I drizzled my buffalo chicken flatbread with ranch afterwards just for presentation.
6. Cut in half or serve whole. Devour.

How to Propose to Your Bridal Party on a Budget [DIY]

Happy WEDnesday! I’ve got weddings on the brain today, probably because we just hit our negative 1 year anniversary! And thankfully we’ve got most of the big stuff booked! One of the events that I knew would take a lot of thought was deciding how I would propose to my half of the bridal party. Right after Will & I got engaged in April, I immediately started thinking of how I would ask my MOH and Bridesmaids to be in our wedding. These ladies are extremely special to me and have been by my side through everything; I knew it had to be something more than just a question.

Pinterest is beyond overwhelming with various sites to purchase cards/jewelry etc. to propose to your ladies, but that also tends to be pricey, especially if you’ve got six in your party like me. Being a MOH/Bridesmaid isn’t easy on the wallet either, so I wanted to show each of them just how much it would mean to me to have them standing by my side on one of the best days of my life. This is a completely DIY proposal that still packs the sentiment [I even got tears!] without breaking the bank [you’ve got plenty of time for that leading up to the BIG day]!

Because I’m having six ladies on my side, it was a little difficult finding items that were all exactly the same, so some I switched up based on their personalities and others I kept uniform, if possible.

I decided to pick tentative colors of Navy, Gold and Lavender and make gifts with the theme of those colors running through.

Here’s what I used:

Wood Box/Shadow Box
We’re going with a rustic theme, so I used unfinished wood for the boxes/crates. For the Bridesmaids, I used a hinged shadowbox from Michaels. I wanted the top to be glass, so they could immediately see what it was, but I had to go to a few different locations to find these, so if you can only find solid topped boxes, so work great too! For the MOH, I used a crate without a top, since there were a few more things I wanted to include.

Initial Letters
I wanted to personalize each box, so I got a letter for each of their names and spray painted them Navy. I tried gold, but all the spray paints I found were too light. The golds that were darker incorporated glitter and made a huge mess. So, Navy it was! For me, trial and error was key here.

Cards
Of course, I wanted to write a little something to each of them reminiscing about our friendship and telling them how I’d neverbeenso lucky to have them in my life! I got blank cards from Target and wrote a little something in each. But I also wanted to include the main question on the envelope. I was going to just write it, but decided to get crafty and emboss them. I’ve never used an embossing tool before [again, trial and error], but I think they turned out well! Essentially you write with a glue pen, layer the glue with glitter and then emboss [or heat] the writing, so that it gives some texture, but stays in place. I used gold glitter here to offset the navy.

Photos
I’m a big fan [and have a ton] of photos with these ladies, from embarrassing middle school days to drunk nights to being a grown up, so I knew those would be a staple in the presentation. I’m lucky enough that these ladies have had time to get to know Will very well and build a special relationship with him in their own way, so I included photos of each of them with him also. I found some gold binder clips at Target to hold the photos together.

Soaps
I LOVE soaps! The smells are so relaxing and they feel luxurious on my skin! I wanted the ladies to feel this as well! So I found some lavender colored soaps to go with the theme (and because they smell delightful). For the MOH, I included a couple fancier soaps and tied them together with string. Again, little enhances to the MOH’s box just gives her that bit of something special, you picked her as your MOH for a reason!

Notepads
I included a gold notepad and gold pencils I found at Target. These ladies will be keeping lots of notes for you, they’re going to need a place to keep track of it all!

Special Quote
I found these magnets that say “when I count my blessings, I count you twice!”

Important Info
When you ask your bridal party, you probably wont have a ton of wedding info just yet. But it’s likely you will have the names of all the bridesmaids and groomsmen, the venue, and the date, so include those on a piece of paper so your ladies have a couple details to work with. I just typed up each piece of information on a separate page in word, printed it on a small piece of cardstock, punched a hole in the corner and tied each piece together with string.

Flowers
I included some fake flowers from Michael’s to fill up empty space in each box. Go with a color you think you may use on your wedding, but remember nothing is set in stone, it’s still early!

Colored Candies
Include sweet treats that have wrapping coinciding with the color scheme set up for your gift! I used gold-wrapped Lindt truffles and gold-wrapped Ghirardelli squares.

Champs & Straws
Most liquor stores have small bottles of champagne and what better reason to toast than you making the decision to include this special person on your special day! I found some great gold/white paper straws at Michael’s. Cheers!

After all was said and done, I’d say each of these was roughly $20, which is an ultimate steal, IMO.

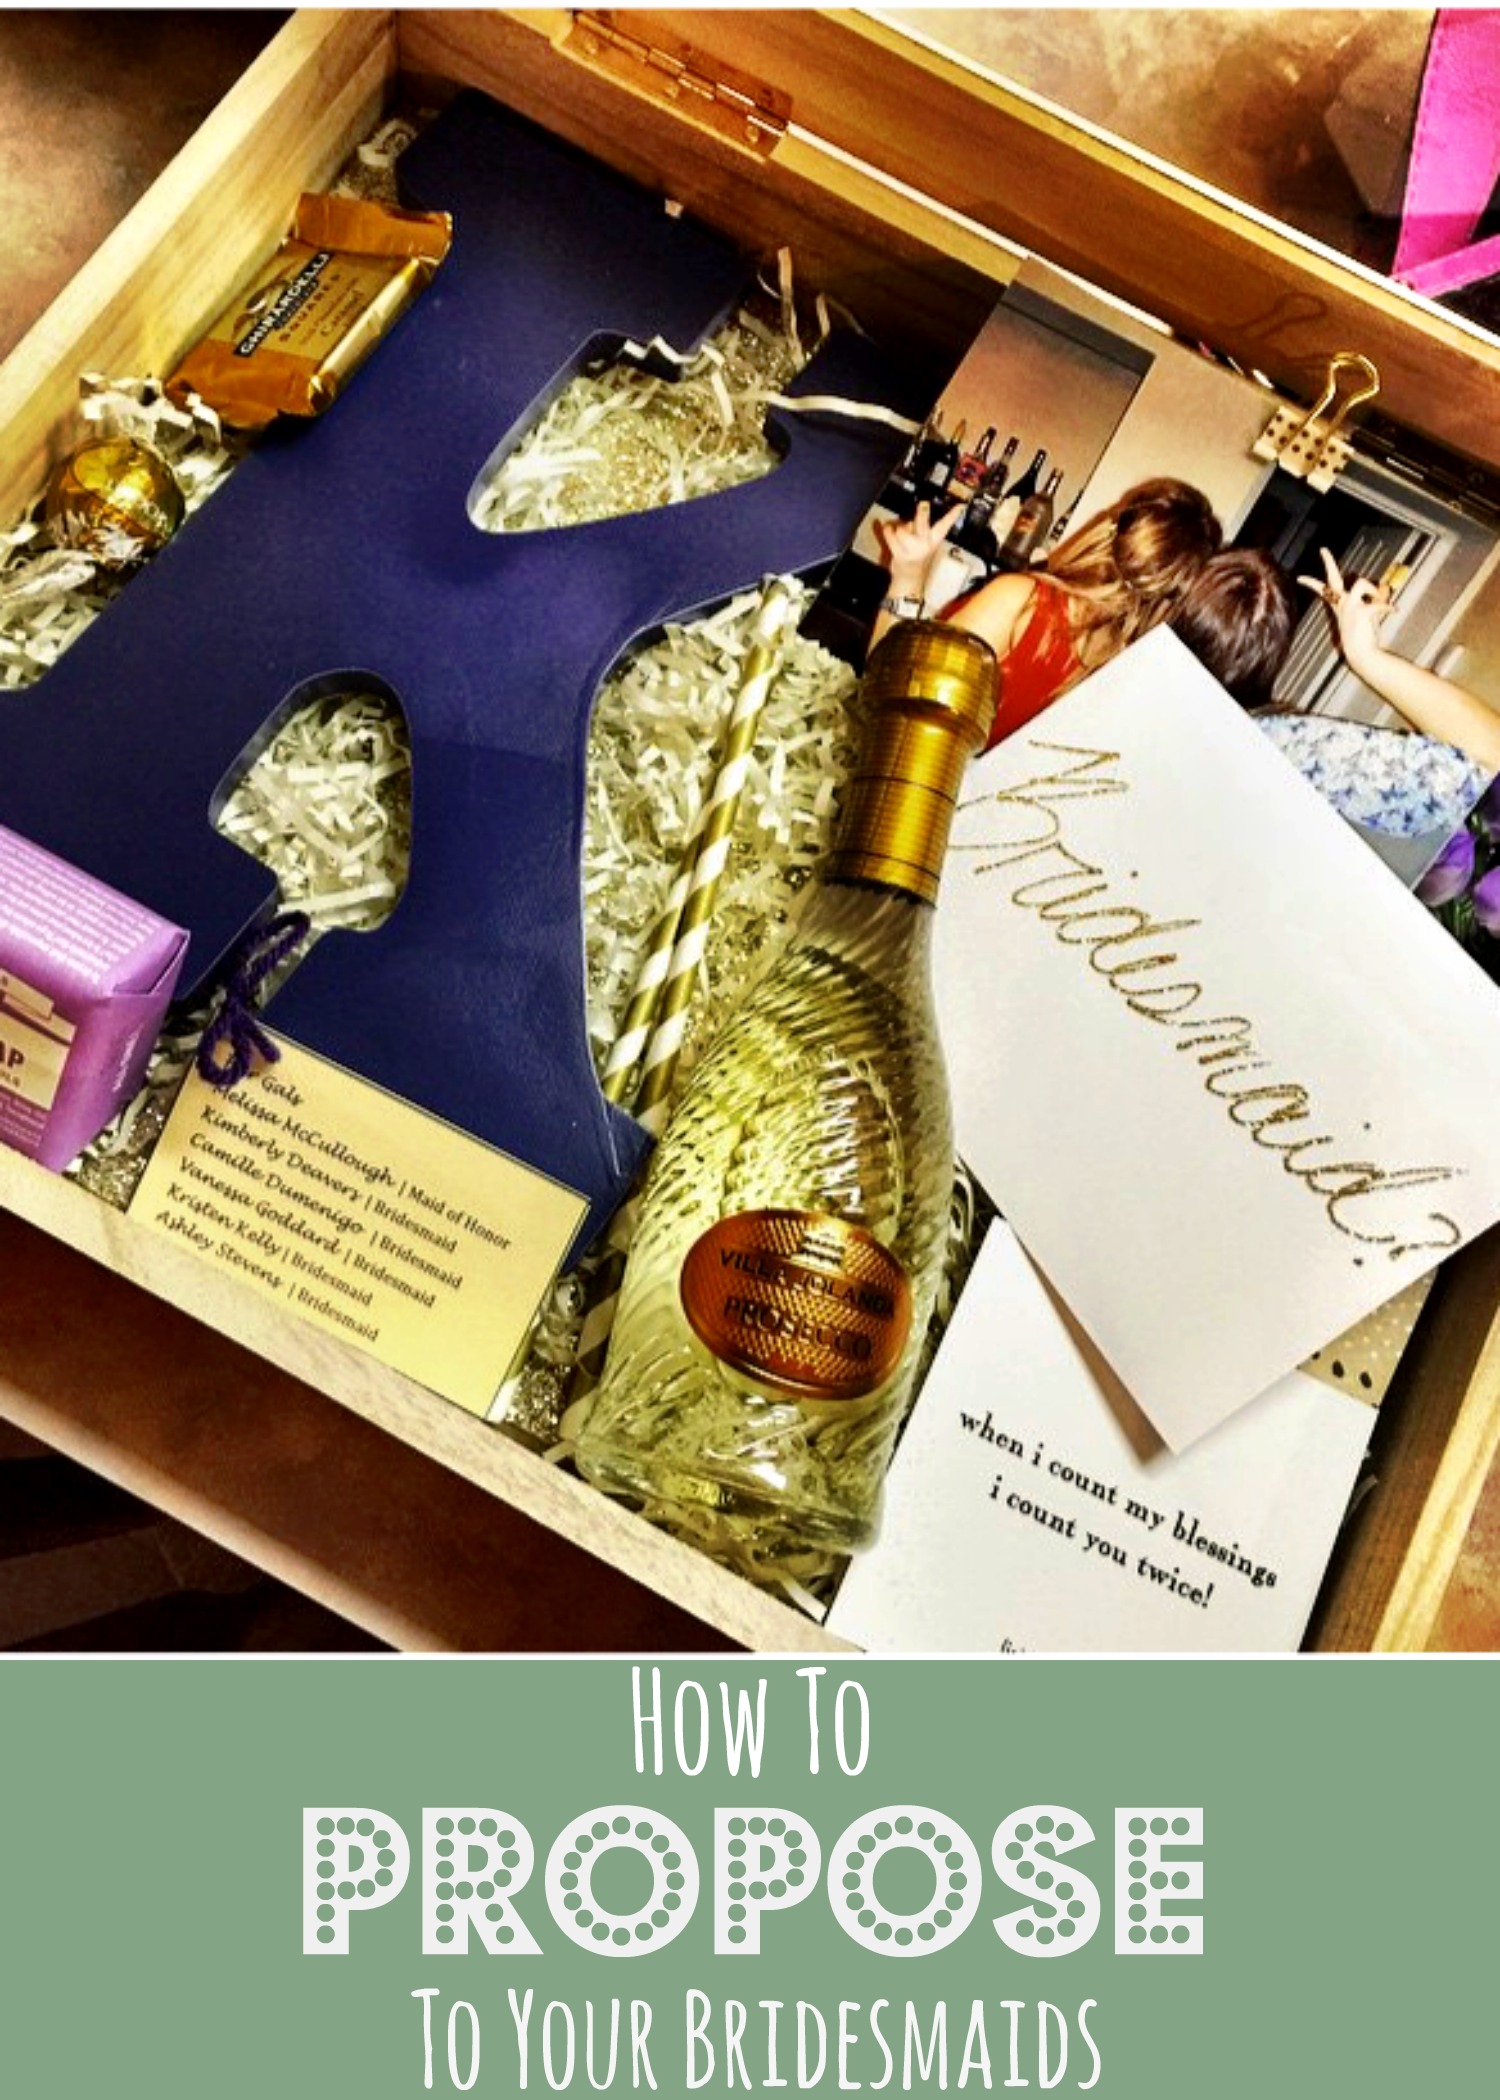
Here is the box I made for my MOH:

How to Propose to Your Bridal Party [DIY] - MOH

Here are a few I made for my bridesmaids [they both have K names], but just wanted to include a few different angles.

How to Propose to Your Bridal Party [DIY] - Bridesmaid

How to Propose to Your Bridal Party [DIY] - Bridesmaid

Here is another one I made for a Bridesmaid, you get a better look at the amount of photos I included and the inside of the card.

How to Propose to Your Bridal Party [DIY] - Bridesmaid

Ultimately, you want it to be special. These are your girls; you know them best and what they’ll love! How did you propose to your bridal party?! What other DIY projects did you create to save money?!

How To Propose To Your Bridal Party on a Budget

DIY Pizza Slice + Delivery Boy Couples Costume

Halloween is fast approaching. My friends and I like to go with DIY costumes, they’re cheaper and usually more original than what you can find at any Halloween store. Last year we went as pizza slices and delivery boys! We found this awesome idea on Studio DIY and changed it up just a bit based on what we had.  I’ve neverbeenso stoked to show it off! It was a huge hit! Because, well, pizza.

DIY Pizza Slice + Delivery Boy Couples Costume

Studio DIY used a Cricut, but since neither of us had one, we used old fashioned cardstock, freehand and scissors.
We also found that wearing the entire costume was a little challenging, so we just wore the back pizza slice as a “backpack” and picked up the front slice as we walked around.

Materials
For the Pizza Slice:
Cardstock in Red, White and Green
Large Sheets of Cardboard (we used the trifolds used for science fair projects)
Yellow and Red Streamers
White School Glue
Scissors
Heavy String
Stapler
Yellow Dress
Black Tights (if its cold)

For the Delivery Boy:
Pizza Box
Pizza Shop T-Shirt
Jeans
Baseball Cap
*We have our favorite pizza shop down the street (where sadly they know us by name), so we decided to go get pizza boxes and t-shirts from there to promo the biz.*

Instructions
1. Draw stencils for the toppings (pepperoni, mushroom and green pepper – it took us a couple tries, and they didn’t look perfect, but they worked) and cut 3 of each for each side of the slice – In total, for one costume, you should have 6 pepperonis, 6 mushrooms, and 6 green peppers.

2. Cut two large “triangles” from your cardboard. I measured from my shoulders to my knees for the length, and about six inches wider than the width of my shoulders for the width. Trim the corners of the bottom edge to give it the “curved” look of a pizza crust.

3. Cut several six foot long strips of streamers. Fold each one in half again and again until you have a section about a few inches wide. Cut one side of each section into fringe strips, about 1/2” apart.

4. Starting at the point of the triangle. Glue strips of fringe, starting about 1/2” apart working your way all the way up the triangle, but leaving about 5” unfringed at the bottom.

5. Cut a strip of red streamer the width of your triangle and trim the edges to make them wavy. Glue this piece over where your yellow streamers end, forming the “sauce” of the pizza.

6. Glue your toppings on now, however you so choose.

7. Staple string to the back pizza slice for you to wear as a “backpack” (a loop on each side to slip your arms through).

Put on your slices and delivery boy costumes and be ready for the applause! BONUS POINTS: actually have pizza in your pizza boxes!

DIY Pizza Slice + Delivery Boy Couple Costumes

DIY Pizza Slice + Delivery Boy Couple Costumes

DIY Cork Board Engagement Gift 

Lately it seems love is in the air, everywhere I look around! Will & I have already received SIX Wedding Save The Dates for 2016 (and we’ll be sending out our own very soon!)

Wineries are trending BIG in the wedding industry right now; people are getting engaged at wineries, having engagement photo shoots at wineries, throwing bachelorette wine tours, and having weddings at wineries (like us!).

Recently two of our closest friends got engaged at Barrel Oak Winery in Virgina. I’m a big fan of sentimental/meaningful gifts (I’m a huge sap!), so I wanted them to have something to always remember the place they got engaged (other than the rock on her finger!)!

Coincidentally my girlfriends and I had a bachelorette wine tour at the same winery after I found out they were engaged. Wineries go through corks, like I go through red wine. So i decided to ask if they had any corks I could have for a DIY project.  JACKPOT, the woman ended up giving me an entire bag of corks!

And here in lies the result..a cork board to hang on their wall with corks from the place they were engaged.

image1-3
Now you want to get into the nitty gritty of how its done. Three words, SIMPLE, QUICK, CHEAP..my favorite kind of DIY project.

SUPPLIES
Corks
Hot Glue Gun
Frame – White looks clean (size of the cork board you want to give – this one is 24″ x 12″)
Sauce Pan
Strainer
Sharp Knife

I did this project for under $10 – the cost of the frame! And in less than TWO hours!

HOW TO
1. Remove the glass from your frame, but leave the backing in so you have a place to glue the corks.
2. I cut all my corks in half so that I’d have a flat edge to glue down (and then I was able to double the amount of corks I had!) – to make this process easier, I brought a saucepan of water up to a boil and placed a small strainer on top, covered and let sit for 20 minutes. Make sure the water level is low enough that the corks are not touching. You’re essentially steaming the corks to make them easier to cut.

image1-4
3. Using a sharp knife, cut all of your corks in half and place them in the frame how you want the finished product to look. This will allow you to fix spacing before you start gluing. Get creative! But if possible, always have the name of the winery facing outward – gives it a personal touch.

FullSizeRender-4

4. Start the gluing process. I left all of the corks in the frame and just picked them up and glued as I went, that way I wouldn’t forget the pattern.

IMG_2481

YOU ARE DONE!
To personalize it one step further, as you saw above, I printed out a few photos of the couple and tacked them on before gifting! How easy was that?!

What are some DIY engagement gifts you’ve given?!