Treatsie Review and 50% Off!

Anyone who knows me knows I LOVE my sweets. Could literally live off sugar. I also really love subscription boxes (continue reading for a 50% off coupon!!). Receiving packages in the mail is my favorite, so I always find it hard to say no to getting pretty little boxes dropped off at my door step on a monthly basis.

Treatsie combines both of these loves into one little package and I have to say I’m really digging it. I tried it out for the first time this month (you can purchase various plans – monthly, quarterly, annually – you know how subscription boxes work).

Treatsie Review and 50% Off

Now let’s get into the goodies. Conveniently, I received my June Box on a 98 degree day with a heat advisory, so naturally I thought, everything would be melted. NOPE. Treatsie surrounds the box with ice gel packs and just incase that isn’t enough, they have a melt-free guarantee. If a product arrives melted, you contact them and they’ll replace it! #neverbeenso impressed.

June’s box came loaded with the following four products:

1. Lemon Cooler Cookies by Love, Cookie
Lemon Cooler Cookies by Love, Cookie

You don’t get 1 or 2 cookies, you get a whole sleeve! And these cookies had just the right amount of lemon! Super refreshing on this HOT day!

2. The Original Brownie by Salt of the Earth Bakery
The Original Brownie

Oh.my.god. That’s literally all I kept thinking in my head after every bite. This brownie incorporates a trio of chocolate with a dash of Halen Mon sea salt. So soft and chewy. I still can’t stop thinking about this brownie. I’ll have an entire box of these, please.

3. Black Lava Sea Salt Caramels by McCrea’s Candies
Black lava sea salt caramels

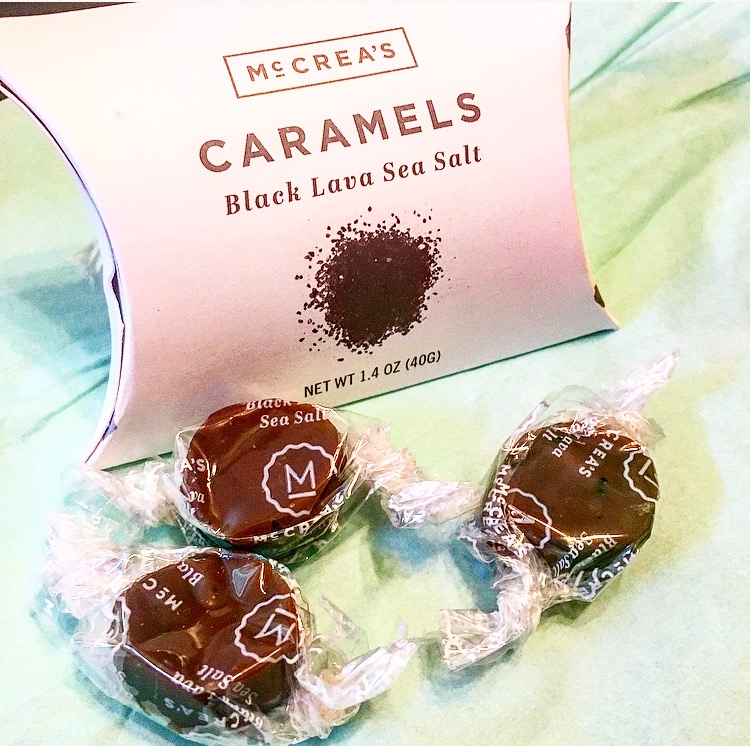
These little babies are dangerous. I could just pop them in my mouth all day! Again, the pairing of chocolate and sea salt takes away all self-control.

4. Maple Almond Brittle by Sweet on Vermont
Maple Almond Brittle

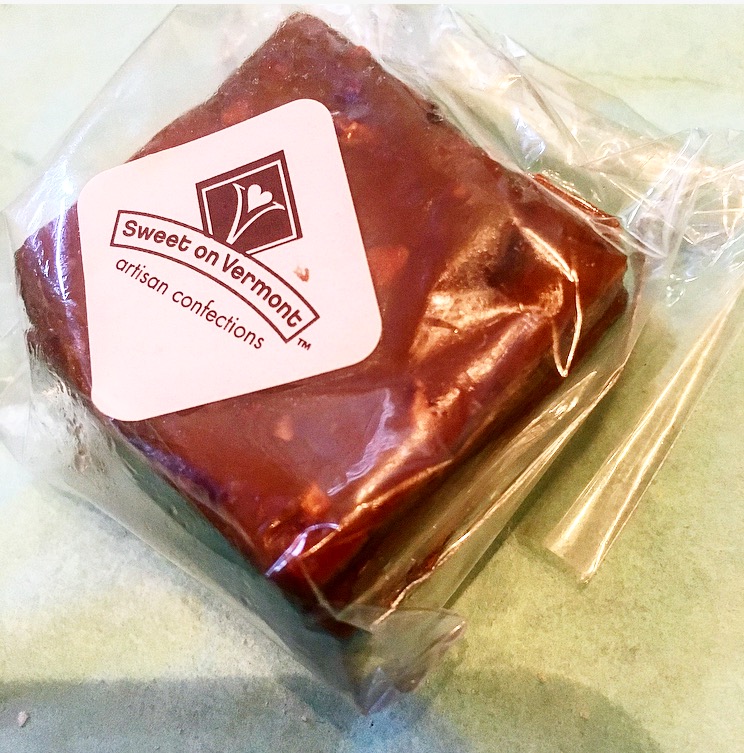
I have to say I’ve never been a fan of brittle. But this stuff is pretty amazing. The rich maple syrup flavor paired with the crushed almond is a match made in heaven!

Overall, I have to give Treatsie five stars! There wasn’t one item I didn’t like, the portions were good size (except that they had me wanting more more), and the packaging was on point. Have I convinced you to try Treatsie?! Well you’re in luck! If you use code “NEVERBEENSO50” on Treatsie.com you’ll get 50% off your first order! (That’s only $9.98 for 1 month, $28.43 for 3 months and $101.50 for the whole year)! 

What are you waiting for?!

5 Minute S’mores Mug Cake

I have a major sweet tooth and I love to bake. Normally these two go hand in hand. However, sometimes I’m lazy. I need that sweet tooth fix without all the work. Insert: individual mug desserts. I have neverbeenso obsessed with these cute little desserts for one. Mug desserts have been around for some time, so I’m not reinventing the wheel here, but this S’mores Mug Cake is to die for. I had everything in my pantry and it took all of 5 minutes from start to devour. You won’t be sorry.

As I mention below, this recipe uses Kraft Jetpuffed Marshmallow Crème, but if you don’t have that, any Kraft marshmallow product (Mallowbits, mini marshmallows etc) will do.

5 Minute S'mores Mug Cake

5 Minute S’mores Mug Cake

  • Servings: 1
  • Difficulty: super easy
  • Print

Ingredients
2 T. butter, melted
¼ cup graham cracker crumbs
2 T. brown sugar, packed
½ T. granulated sugar
¼ cup milk
¼ cup + 1 T. all-purpose flour
¼ tsp. baking powder
dash of ground cinnamon
2 T. Kraft Jetpuffed Marshmallow Crème
2 T. chocolate chips
1 T. Kraft Jetpuffed Marshmallow Creme, for garnish
Chocolate syrup, for garnish

Directions
1. In a mug, add in the butter, graham cracker crumbs, brown and granulated sugar. Stir to combine.
2.  Add in the milk and stir until combined.
3.  Add in the flour, baking powder and ground cinnamon. Stir until combined and smooth.
4. Stir in the Jetpuffed and chocolate chips. Note: If you don’t have Jetpuffed Marshmallow Creme, Mallowbits or regular mini marshmallows would work.
5. Place in the microwave. Heat for 1 minute and 35 seconds.
6. Place remaining Jetpuffed on top of cake. Drizzle with chocolate syrup.
7. Let cool slightly and eat.


Kit Kat Crunch Bars

At work, we’ve been doing a ton of charity bake sales during this holiday season. So I’ve been constantly thinking up recipes that are easy to package into small wrapped bags for easy distribution. These deliciously chocolatey crunch bars were a huge hit and were part of the $600+ we raised in our first bake sale!

This recipe is super easy (no bake!) and the mix of Kit Kats + Rice Krispies + Peanut Butter make the most delightful combination to satisfy your sweet tooth.

Kit Kat Crunch Bars

The only cooking done in this recipe is heating up the mixtures in the microwave for a few minutes. The bars come together beautifully as they chill.

Kit Kat Crunch Bars

Kit Kat Crunch Bars

Kit Kat Crunch Bars

Now, for the chocolate topping!

Kit Kat Crunch Bars

Kit Kat Crunch Bars

I love these bags of Kit Kat minis, they are so easy to cook with and really cut down on the time you’d spend chopping multiple bars evenly.

Kit Kat Minis

Kit Kat Crunch Bars

Kit Kat Crunch Bars

  • Servings: 42 Bars
  • Difficulty: easy
  • Print

Ingredients
Base
2 heaping cup creamy peanut butter (do not use natural or homemade peanut butter)
1 cup light corn syrup (light-colored, not lite)
1 cup granulated sugar
1/2 cup light brown sugar, packed
2 tablespoon vanilla extract
6 cups Rice Krispies cereal

Topping
1 bag Kit Kat minis (you could also buy individual bars and chop them into uniform pieces)
1/2 cup creamy peanut butter (do not use natural or homemade peanut butter)
2 cup Rice Krispies cereal

Directions
Base
1. Line an 13 x 9 inch pan with aluminum foil leaving overhang, spray with cooking spray; set aside.
2. In a large microwave-safe bowl, combine peanut butter, corn syrup, sugars, and heat on high power for 1 minute to melt.
3. Stop to stir. Mixture will be on the granular side, this is okay.
4. Return bowl to microwave and heat for 1 more minute on high power.
5. Stir in the vanilla.
6. Stir in 6 cups cereal.
7. Turn mixture out into prepared pan, packing it down somewhat firmly with a spatula and smoothing the top; set pan aside.

Chocolate Topping
1. In a medium microwave-safe bowl, combine chocolate chips, peanut butter, and heat on high power for 1 minute to melt.
2. Stop to stir. Chips may not be completely melted. Return bowl to microwave and heat in 15-second bursts until chocolate can be stirred smooth, 15 seconds is likely all they’ll need.
3. Stir in 2 cups cereal.
4. Pour chocolate mixture over base, packing it down somewhat firmly with a spatula and smoothing the top.
5. Place the Kit Kats Minis in about 6 evenly and tightly spaced rows over the surface, with about 1/4-inch space between each piece (does not have to be perfect). By the time you get all the pieces on and in rows, the pieces you placed on first will likely have started to melt at the base. Push them down lightly so they embed into the chocolate-crispy layer. Go back over and push on all the pieces with your finger to ensure they’re all embedded and will stick as the bars cool and set up.
6. Cover pan with a sheet of foil (to prevent fridge smells), and place pan in fridge to set up for at least 2 to 3 hours, or overnight, or until chocolate layer is completely set before lifting out with foil overhang, slicing, and serving.

*Bars will keep airtight at room temperature for up to 1 week, in the refrigerator for up to 2 weeks, or in the freezer for up to 6 months.*

Kit Kat Crunch Bars


Healthy Deep Dish Cookie Pie

Will this rain ever stop?! It’s been two full days of nothing but RAIN. And what’s worse is by the time I get home it’s dark, so there really is no getting me to do anything productive after work. All I want to do is Netflix & NOM.

This deep dish cookie allowed me to do just that and not feel totally bad about it. It’s so decadent and chocolatey and warm and even SOMEWHAT healthy! I was a bit skeptical when trying out this recipe from Chocolate Covered Katie because one of the main ingredients is beans. I’ve done the whole bean thing before and it was not a pleasant result, but Katie knows what she’s doing. NEVERBEENSO delicious!

Healthy Deep Dish Cookie Pie

Chocolate Covered Katie

Healthy Deep Dish Cookie Pie

  • Servings: 6
  • Difficulty: easy
  • Print

Ingredients
2 cans white beans or garbanzos (drained and rinsed) (500g total, once drained)
1 cup quick oats
1/4 cup unsweetened applesauce
3 tbsp oil (canola, veg, or coconut)
2 tsp pure vanilla extract
1/2 tsp baking soda
2 tsp baking powder
1/2 tsp salt
1 1/2 cups brown sugar
1 cup chocolate chips

Directions
1. Preheat the oven to 350 degrees F.
2. Blend everything (except the chips) very well in a good food processor (not a blender).
3. Mix in chips, and pour into an oiled pan (I used a 10-inch spring-form pan, but you can use a smaller pan if you want a really deep-dish pie.)
4. Bake for around 35-40 minutes. Let stand at least 10 minutes before removing from the pan.
5. Pair with milk and indulge!

Mexican Chocolate Pecan Pie 


Need I say more here? Probably not, but I will..

HAPPY THANKSGIVING EVERYONE! Every Thanksgiving I try a different rendition of a pecan pie. Last year it was whiskey pecan pie, but let’s just say whiskey-1, me-0.

This year I was inspired by Chef Marcela’s Mexican Chocolate Pecan Pie. This recipe only takes up your oven for 10 minutes and on Thanksgiving that’s about all I have between everything else. There were some conflicting reviews posted on Marcela’s recipe, so I decided to change it up a bit when it came to a few ingredients.

The Perfect Pie Crust  

This is the Mexican chocolate I ended up finding. Wasn’t the brand the recipe recommended, but I found it at Whole Foods and ended up mixing in some milk chocolate and cinnamon.

Mexican Chocolate

  Mexican Chocolate Pecan Pie

Mexican Chocolate Pecan Pie

  • Servings: 6
  • Difficulty: easy
  • Print

Ingredients

Crust
Nonstick cooking spray, for pie dish
1.5 cups graham cracker crumbs
7 tablespoons unsalted butter, melted
2 tablespoons packed light brown sugar

Filling
12 tablespoons unsalted butter
½ cup packed light brown sugar
6 tablespoons light corn syrup
3 cups pecan halves (about 10 oz)
1/4 cup whipping cream
2 oz Mexican chocolate (I used Taza Chocolate – found at Whole Foods), finely minced
1 oz milk chocolate, finely minced
2 teaspoons cinnamon

Directions

Crust
1. Spray a 9-inch pie dish with cooking spray.
2. Blend the graham cracker crumbs, melted butter and light brown sugar together in a medium bowl by hand.
3. When well combined, press the crumb mixture into the bottom and up the sides of the prepared pie dish. Cover the crust and freeze while preparing the filling. (Can be prepared 1 week ahead and kept frozen).

Preheat the oven to 350 degrees F.

Filling
1. Combine the butter, brown sugar and corn syrup in medium saucepan. Bring to boil, stirring often. Boil 1 minute.
2. Stir in the pecans and whipping cream. Boil until the mixture thickens slightly, about 5 minutes. Remove from the heat.
3. Add the chocolate, cinnamon and stir until the chocolate melts and the mixture is well blended.

Pour the filling into the crust. Using a spoon, evenly distribute the nuts. Bake until the filling bubbles all over, about 10 minutes. Transfer the pie to a rack and cool completely.