Watermelon Jello Shots

My group of friends is famous for vodka gummy bears and I’ve even seen champagne gummy bears (#adult) popping up recently. But I’ve never been so obsessed with jello shots. Especially at parties. I’m sure you’ve seen jello (shots) in almost every mold imaginable.

Summer cookouts are my favorite type of party. And being that every minute detail of a party needs to be theme-related in my house, I decided to take on the task of making Watermelon Jello Shots for our Fourth of July Cookout coming up this weekend, but really these are perfect for any summertime party. This recipe is similar to that of a DIY-project – concentration and dedication are necessary!

Watermelon Jello Shots

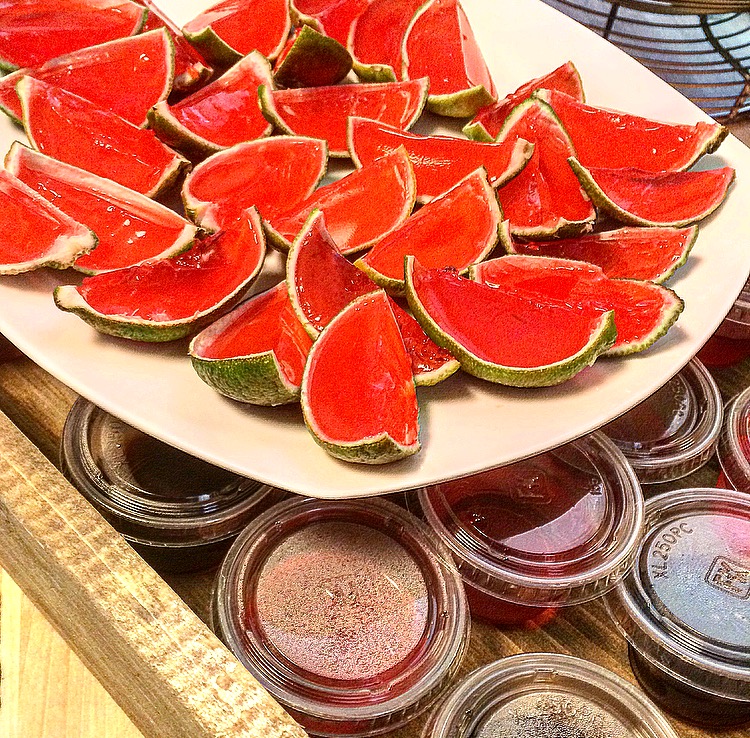
I made a test batch to see if this would actually work. And it did! The most-time consuming part of these is de-pulping the limes, and that can be done a day ahead of time. Actually, you could even do up through step 5 a day ahead of time, and then the jello has longer to harden in the refrigerator. Not to mention, they’re totally adorable and worth it.

Watermelon Jello Shots

  • Servings: 40
  • Difficulty: hard
  • Print

Ingredients:
10 limes
1 box watermelon jello (or any red flavor you like)
1 cup water
1.5 cup cold vodka (use watermelon if you have it)

Directions:
1. Boil 1 cup of water.

2. Halve the limes, using a paring knife cut around the edges to loosen the pulp. Juice your limes, so that you can at least have fresh lime juice instead of wasting all of the pulp. Using your fingers try to pry out as much of the pulp as possible. I found a small spoon under warm running water helped with this. Be gentle – you don’t want to puncture the lime. Re-shape them if they lost shape during the de-pulping. Set the lime halves aside. If you have the time, pop them in the freezer so that when you pour the jello in, they hold their shape.

3.  Add 1 cup of boiling water to the jello powder, and stir for 2 minutes until fully dissolved. Stir in 1.5 cups cold vodka.

4.  Pour the mixture into the lime halves, filling all the way to the top.

5. Chill the jello limes for at least 2 hours, making sure they stay upright.

(Note: De-pulping the limes is the most time-consuming and you can do that part, as well as fill the lime halves with jello to chill, a day prior if you want.)


6. Once firm, use a very sharp knife to cut the lime halves in half (2 wedges per half)

*Some limes will puncture and some will not cut as planned, but I ended up making a small batch of these for aesthetics and having another batch of regular jello shots on hand. Your call.

You Can Make This Blue Apron Meal All On Your Own (And You Need to ASAP!)

We LOVE Blue Apron in our house. We like to do it once a month as a treat; it gives us a nice break from meal planning and grocery shopping. What I really love about Blue Apron is it brings new flavors into our house that we wouldn’t normally cook with and we don’t end up having to buy an entire bottle or package of a unique ingredient and watch it go to waste.

Occasionally, we come across a flavor profile that is so out of this world delicious, YET not totally off the wall and when that happens I set the recipe aside because I know this is one I’ll make again on my own. This time, it was the Seared Pork Chops and Fig Compote with Kale and Farro Salad. OH MY GOODNESS, was this delicious. and beautiful. and easy!

While I’m not new to the flavor of fig (I love it!), I am new to cooking with them and pairing them with pork. Normally I just slather fig jam all over every soft cheese I can find. However, this recipe called for dried figs and you can find them ANYWHERE!

You Can Make This Blue Apron Meal On Your Own (And You Need to ASAP!)

The kale and farro salad paired so well with the lemon juice and the pork, I literally could not put my fork down. Excuse my  lack of photos, I was starving, and didn’t think I’d be sharing this recipe, but I would be doing a disservice if I did not pass this along. Share your Blue Apron faves with #neverbeenso!

You Can Make This Blue Apron Meal On Your Own (And You Need to ASAP!)

5 Minute S’mores Mug Cake

I have a major sweet tooth and I love to bake. Normally these two go hand in hand. However, sometimes I’m lazy. I need that sweet tooth fix without all the work. Insert: individual mug desserts. I have neverbeenso obsessed with these cute little desserts for one. Mug desserts have been around for some time, so I’m not reinventing the wheel here, but this S’mores Mug Cake is to die for. I had everything in my pantry and it took all of 5 minutes from start to devour. You won’t be sorry.

As I mention below, this recipe uses Kraft Jetpuffed Marshmallow Crème, but if you don’t have that, any Kraft marshmallow product (Mallowbits, mini marshmallows etc) will do.

5 Minute S'mores Mug Cake

5 Minute S’mores Mug Cake

  • Servings: 1
  • Difficulty: super easy
  • Print

Ingredients
2 T. butter, melted
¼ cup graham cracker crumbs
2 T. brown sugar, packed
½ T. granulated sugar
¼ cup milk
¼ cup + 1 T. all-purpose flour
¼ tsp. baking powder
dash of ground cinnamon
2 T. Kraft Jetpuffed Marshmallow Crème
2 T. chocolate chips
1 T. Kraft Jetpuffed Marshmallow Creme, for garnish
Chocolate syrup, for garnish

Directions
1. In a mug, add in the butter, graham cracker crumbs, brown and granulated sugar. Stir to combine.
2.  Add in the milk and stir until combined.
3.  Add in the flour, baking powder and ground cinnamon. Stir until combined and smooth.
4. Stir in the Jetpuffed and chocolate chips. Note: If you don’t have Jetpuffed Marshmallow Creme, Mallowbits or regular mini marshmallows would work.
5. Place in the microwave. Heat for 1 minute and 35 seconds.
6. Place remaining Jetpuffed on top of cake. Drizzle with chocolate syrup.
7. Let cool slightly and eat.