Bacon Jams GIVEAWAY and Recipe for Bacon Jam Deviled Eggs with Pancetta

Guys this post is HUGE! Not only am I sharing a fantastic recipe for deviled eggs, but I’ve partnered with The Bacon Jams to give away a free jar to one of my lucky followers (more about that in a bit!).

Bacon Jams GIVEAWAY and Recipe for Bacon Jam Deviled Eggs with Pancetta

As you read in 11 Baltimore Restaurants Doing Deviled Eggs Right, deviled eggs are one of my most recent obsessions and I’m not mad about it. However, I just recently made these babies for the first time! I’ve seen tons of recipes online, but had some plans of my own.

Thanks to a giveaway hosted by Official Food Group, I won a variety pack from The Bacon Jams including their original flavor, Red Chile and Garlic, and Black Pepper. I started putting the original flavor on EVERYTHING and then started experimenting with the others. I thought to myself, how good with this stuff be incorporated in deviled eggs! After a few recipe revamps, I came up with the MOST DELICIOUS combination and I can’t stop making them! And because I love all of your support so much, I decided to host a giveaway myself to pay it forward AND include this recipe!

RULES FOR GIVEAWAY:
1. Head on over to Instagram and follow @neverbeenso and @thebaconjams
2. Like the photo associated with this post/giveaway
3. Tag 2 bacon-loving friends
**Open to U.S. residents only**
Winner will be picked randomly and will receive one jar of his/her choosing (original, red chile and garlic or black pepper). 

Announced Friday, June 17 on Instagram!!

Now for the recipe! First, I tried these without the pancetta to make it easier (and still totally delicious), BUT if you have the time it’s definitely a nice addition of texture!

I read about several different takes on what makes the eggs easiest to peel. I found that adding vinegar and salt to the boiling water, as well as peeling them under cool running water worked nicely. But I’m always up for new tips! Leave your suggestions in the comments below!

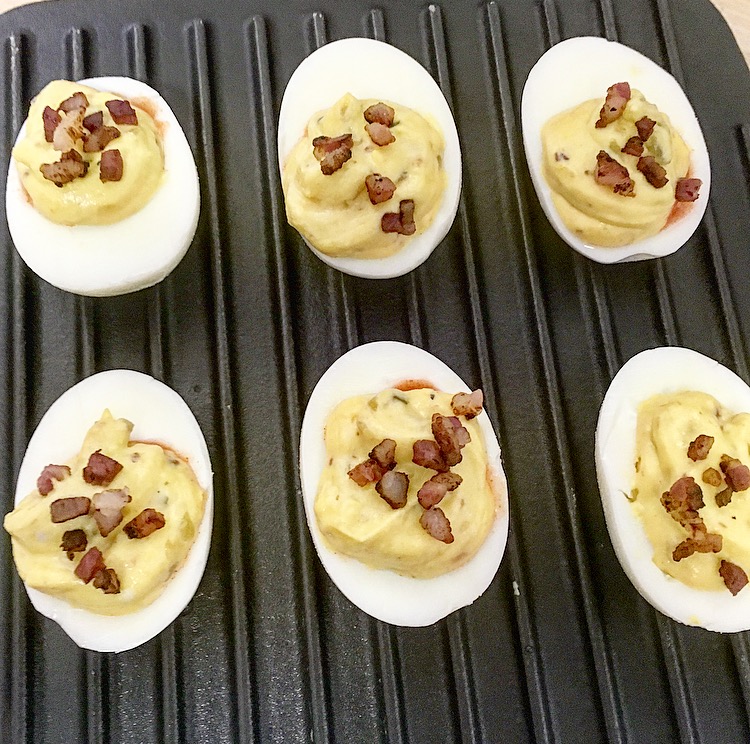
NOTE: The recipe below is for 12 deviled eggs (6 whole eggs), but the pictures included show only 6 deviled eggs.

Bacon Jams GIVEAWAY and Recipe for Bacon Jam Deviled Eggs with Pancetta

I love using this handheld strainer to gently remove the eggs and place them in a cold water bath.

Bacon Jams GIVEAWAY and Recipe for Bacon Jam Deviled Eggs with Pancetta

You will have more pancetta for the servings below.

Bacon Jams GIVEAWAY and Recipe for Bacon Jam Deviled Eggs with Pancetta

Bacon Jams GIVEAWAY and Recipe for Bacon Jam Deviled Eggs with Pancetta

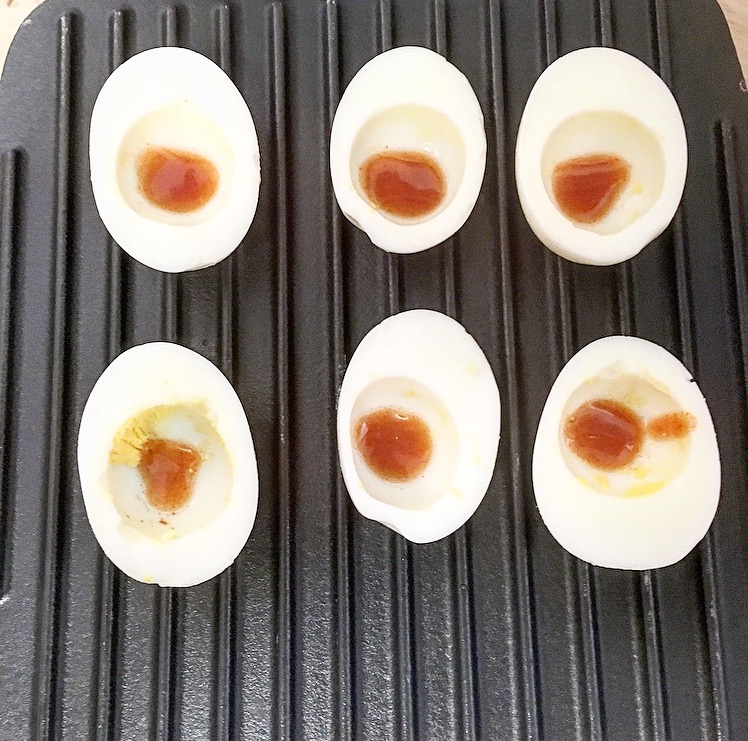
Who doesn’t love a hot sauce surprise??

Bacon Jams GIVEAWAY and Recipe for Bacon Jam Deviled Eggs with Pancetta

Bacon Jams GIVEAWAY and Recipe for Bacon Jam Deviled Eggs with Pancetta

Bacon Jam Deviled Eggs with Pancetta

  • Servings: 12
  • Difficulty: easy
  • Print

Ingredients
6 large eggs
1 tbsp kosher salt
1 tbsp vinegar
½ cup pancetta, cubed
¼ cup mayo
1 tsp yellow mustard
1 tbsp sweet pickle relish
2 tsp bacon jam (any flavor, I used original)
Fresh ground black pepper
Kosher salt
Hot Sauce (any brand, I used Frank’s)

Directions
1. In a saucepan, combine the eggs with cold water and cover by 1 inch. Add 1 tbsp of salt and 1 tbsp vinegar and bring to a boil over high heat. Once boiling, remove the pan from the heat and cover. Let sit for 10 minutes.
2. Fill a bowl halfway with ice and cold water. Once the 10 minutes are up, transfer the eggs to the bowl of ice water and let sit for 5 minutes.
3.  While the eggs are cooking, spray a nonstick pan with cooking spray and heat over medium heat. Fry the pancetta until it starts to brown, transfer to paper-towel lined plate to cool.
4.  Peel the eggs under cold running water. Halve the eggs lengthwise, then carefully pry out the yolks and transfer to a bowl.
5. Add the bacon jam, mayo, mustard, relish, salt and pepper to taste and mash or beat until smooth. (I found that using a hand mixer here makes the filling super smooth).
6. Squirt a dab of hot sauce inside the empty egg white.
7. Fill a sandwich sized plastic bag with the yolk filling (if you fold the edges of the bag down, the bag will be easier to fill). Force all of the filling to one corner of the bag, snip off the end with scissors, and pipe the filling into the egg whites.
8. Top with pancetta.

NOTE: I like to refrigerate my eggs for at least 30 minutes to get them extra cold, but up to you!


Golf Ball Cake Pops for Father’s Day 

Father’s Day is coming and you know what that means, you get to celebrate the wonderful men in your life, especially your dad (aka the hardest person to shop for)!

If your dad is an avid sportsman like mine, over the years you’ve probably exhausted him with every ounce of paraphernalia of every single one of his sports team’s and any type of sports equipment you could get your hands on. I’ve also gone the route of bringing him things to eat and drink (dad loves a cold beer). This year I took it to a new level and combined both of the ideas I’ve been using for the last 28 years!

I give you golf ball cake pops!

Really any sport will do, as long as you find the mold online and Amazon has an awesome selection. I used these molds (for the balls) and sticks (for the tees) and they worked perfectly!


I tried a couple different cake recipes. I really wanted to somehow incorporate beer, but all of the cake recipes I found that included beer were basically inedible, IMO. Including a very basic cake pop recipe below.

One Little Project has a ton of different cake pop flavor variations.

Here are some tips for coating cake pops that I’ve found helpful.

Once your cake pops are beautiful. Grab an old slab of wood, drill a few holes and you’ve got the perfect presentation of tees on a course! [I’ve also found this is a great way to dry your cake pops].

Golf Ball Cake Pops

  • Servings: 24
  • Difficulty: moderate
  • Print

Ingredients
1 box white cake mix (and ingredients called for on the box)
1 jar white frosting
1 package Candiquik melting chocolate (or any other variation that works for you, but I swear by Candiquik) + 2 tablespoons of white chocolate
Cake pop molds and sticks

Directions
1. Prepare cake (9×13 or 2 rounds) as directed and let cool.
2. Add cake to bowl and crumble until it resembles fine crumbs.
3. Using your hands to incorporate, add frosting a little bit at a time until cake can be formed into a ball, yet slightly crumbly.
4. Freeze your balls for 20 minutes.
5. Melt the 2 TBSP of white chocolate and dip sticks into chocolate and into balls, place back in the freezer for 20 mins.
6. Melt the Candiquik according to directions and then cover each cake pop with the melted chocolate and place into the mold.
7. Let them harden for 10 minutes or so and place on your stand!

Oreo Stuffed Churro Cupcakes

HAPPY CINCO DE MAYO!! This is one of my favorite holidays to celebrate. Tacos, margaritas, tequila, guac; what else do you need? As I was sitting at work today, I couldn’t help but crave churros and wanted to share that craving with my co-workers. However, I was a little late to the game in preparation and decided to think up something quick and easy in my head that I could prep tonight and bring in tomorrow (or this weekend, if I became too lazy).

For the sake of time, I decided to enhance store-bought mix and icing. I figured I could just throw some cinnamon in the batter and call it a day, UNTIL I spotted cinnamon bun oreos! So, I decided to stuff my cupcakes with the oreos and add a little crunchy layer underneath the icing to give them a churro-esque texture.

Alas, Oreo Stuffed Churro Cupcakes. Now, if you don’t have time to whip these up before tomorrow’s festivities, why not expand your Cinco Celebration throughout the weekend?? Or make them just because; they’re that good (AND EASY)!

Oreo Stuffed Churro Cupcakes

Oreo Stuffed Churro Cupcakes

Oreo Stuffed Churro Cupcakes

Oreo Stuffed Churro Cupcakes

Oreo Stuffed Churro Cupcakes

Oreo Stuffed Churro Cupcakes

Oreo Stuffed Churro Cupcakes

Oreo Stuffed Churro Cupcakes

Oreo Stuffed Churro Cupcakes

Oreo Stuffed Churro Cupcakes

  • Servings: 24
  • Difficulty: easy
  • Print

Ingredients
1 box white cake mix (and the ingredients called for on the box)
2 jars cream cheese icing
1 package cinnamon bun oreos (or golden if you can’t find these – and add ground cinnamon)
4 tablespoons of butter, melted
1/4 cup granulated sugar
1 TSP ground cinnamon
Cupcake liners (since these were for Cinco De Mayo, I used red, green and white)
Decorative pieces (found these edible mustaches at Party City)

Directions
1.  Mix cake batter according to box directions. 
2.  Line your muffin tins and pour 1 tbsp batter into each liner and then place one oreo into each liner and push down (the batter should hug the oreo, but not cover). Then place 1-2 tbsp more batter into each liner until they are 3/4 full.  
3.  Bake according to box directions (mine were perfect in 17 mins).
4. Move the cupcakes to a wire rack and cool completely.
5. Once cooled completely, mix granulated sugar and ground cinnamon in a bowl. Brush melted butter on the tops of each cupcake and then dip into cinnamon sugar mixture.
6. Top with cream cheese frosting and decorative pieces.
7. Refrigerate until ready to serve. Set out 20 mins prior to serving.

Creamy Sausage, Kale and Cauliflower Garlic Rice

A few weeks ago, I wrote a post all about my love for brussels sprouts in a new series called 180 Wednesday, documenting foods or experiences I despised as a child and have neverbeenso obsessed with now. This week, it’s CAULIFLOWER.

Creamy Sausage, Kale and Cauliflower Garlic Rice

As a child, this was the most bland (and ugly) vegetable I could think of, even buckets of ranch couldn’t get me to eat it. And now, I’m obsessed. It can be transformed to resemble so many things: rice, mashed potatoes, pizza crust, the list goes on.

I’ve posted a cauliflower fried rice recipe (SO good), but this weekend I wanted comfort food. I mean, rightfully so since it’s been so cold and dreary (who else is ready to throw blows about this snow in April?!). I adapted the Creamy Cauliflower Garlic Rice from Pinch of Yum by adding sausage and kale and it was exactly what the doctor ordered to get me through these freak cold spells. The recipe makes a decadent sauce made mostly of cauliflower, yet tastes like its full of butter and cream and melted cheese.

Stay tuned for several of my go-to cauliflower recipes!

Creamy Sausage, Kale and Cauliflower Garlic Rice

Creamy Sausage, Kale and Cauliflower Garlic Rice

  • Servings: 6
  • Difficulty: moderate
  • Print

Ingredients
1 head cauliflower, florets broken up
4 cups vegetable broth + 2 cups water
½ cup milk
1½ cups brown rice (I used Harris Teeter Basmati Blend)
1 teaspoon salt (plus more to taste!)
4 tablespoons butter
8 cloves garlic, minced
3 cups kale, chopped (stems removed)
16 oz sausage, cut into ½ inch slices (I used Hillshire Farms Turkey Kielbasa)

Directions
1.  Start to cook the rice according to package directions.
2.  While the rice is cooking, bring the vegetable broth and water to a boil in a large pot. Add the cauliflower and boil for about 10 minutes, until tender. Transfer cauliflower pieces to a blender or food processor.
3.  Puree the cauliflower, adding milk or extra vegetable broth to get a smooth, creamy consistency. Season with salt. Set aside.
4. While the rice continues to cook, in a large nonstick skillet, melt 2 tbsp of butter and add the garlic, sauteing over low heat until the garlic is very fragrant, about 3-5 minutes. Add the sausage and kale and mix until sausage browns and kale begins to wilt. Note: The kale should still be bright green.
5. When the rice is done, add remaining 2 tbsp of butter to the rice and pour in the cauliflower mixture, mix until well combined.
6. Add the kale, sausage and garlic mixture into the rice and stir until well combined. Add salt and pepper to taste.
7. Let cool slightly and serve.


Kale Basil Pesto

This entire recipe from Gimme Some Oven is delicious, but the Kale Basil Pesto is the true shining star. Gimme Some Oven pairs this pesto with chicken sausage, gnocchi and brussels sprouts. [This should have been added to my previous post – 15 Ways To Satisfy Your Brussels Sprout Craving!

But anyway, the pesto alone would be delicious on literally anything! Perfect if you’re testing out #meatlessmonday like myself and don’t want to sacrifice flavor!


15 Ways to Satisfy Your Brussels Sprout Craving

Can you think of any foods that you absolutely despised at a younger age and then you had a moment when you tried them again and you’ve neverbeenso obsessed?? I was an extremely picky eater as a child (neverbeenso sorry, Mom!) and now I am being reintroduced to a ton of foods and making up for lost time.

This has happened countless times – peppers, fish, eggs, olives, horseradish AND most recently, brussels sprouts. They’re perfect for bite-sized apps, side dishes, or the main star of any meal. I have been trying every recipe I can get my hands on to satisfy this intense craving. If you still aren’t convinced, these recipes are guaranteed to change your mind!

What are some of your favorite ways to prepare these little beauties? 

Share the foods that have your taste buds doing a 180 with #180wednesday!

1. Roasted Sweet Potatoes and Brussels Sprouts
image

2. Buffalo Brussels Sprouts
15 Ways to Satisfy Your Brussels Sprout Craving

3. Beer Caramelized Onion and Brussels Sprout Pizza
15 Ways to Satisfy Your Brussels Sprout Craving

4. Garlic Lemon and Parmesan Roasted Brussels Sprouts
15 Ways to Satisfy Your Brussels Sprout Craving

5. Roasted Garlic and Bacon Brussels Sprouts
15 Ways to Satisfy Your Brussels Sprout Craving

6.  Shaved Brussels Sprouts Saute
15 Ways to Satisfy Your Brussels Sprout Craving

7. Fried Brussels Sprouts with Honey Balsamic Vinegar Toasted Breadcrumbs 
15 Ways to Satisfy Your Brussels Sprout Craving

8. Kung Pao Brussels Sprouts
15 Ways to Satisfy Your Brussels Sprout Craving

9. Balsamic Roasted Brussels Sprouts with Polenta
15 Ways to Satisfy Your Brussels Sprout Craving

10. Ricotta Herb Stuffed Brussels Sprouts
15 Ways to Satisfy Your Brussels Sprout Craving

11. Brussels Sprouts Gratin
15 Ways to Satisfy Your Brussels Sprout Craving

12. Bacon and Brussels Sprouts Skewers 
15 Ways to Satisfy Your Brussels Sprout Craving

13. Asian Brussels Sprouts Slaw with Carrots and Almonds
15 Ways to Satisfy Your Brussels Sprout Craving

14. Zesty Pickled Brussels Sprouts
15 Ways to Satisfy Your Brussels Sprout Craving

15. Roasted Brussels Sprouts with Garlic Aioli
15 Ways to Satisfy Your Brussels Sprout Craving

Kit Kat Crunch Bars

At work, we’ve been doing a ton of charity bake sales during this holiday season. So I’ve been constantly thinking up recipes that are easy to package into small wrapped bags for easy distribution. These deliciously chocolatey crunch bars were a huge hit and were part of the $600+ we raised in our first bake sale!

This recipe is super easy (no bake!) and the mix of Kit Kats + Rice Krispies + Peanut Butter make the most delightful combination to satisfy your sweet tooth.

Kit Kat Crunch Bars

The only cooking done in this recipe is heating up the mixtures in the microwave for a few minutes. The bars come together beautifully as they chill.

Kit Kat Crunch Bars

Kit Kat Crunch Bars

Kit Kat Crunch Bars

Now, for the chocolate topping!

Kit Kat Crunch Bars

Kit Kat Crunch Bars

I love these bags of Kit Kat minis, they are so easy to cook with and really cut down on the time you’d spend chopping multiple bars evenly.

Kit Kat Minis

Kit Kat Crunch Bars

Kit Kat Crunch Bars

  • Servings: 42 Bars
  • Difficulty: easy
  • Print

Ingredients
Base
2 heaping cup creamy peanut butter (do not use natural or homemade peanut butter)
1 cup light corn syrup (light-colored, not lite)
1 cup granulated sugar
1/2 cup light brown sugar, packed
2 tablespoon vanilla extract
6 cups Rice Krispies cereal

Topping
1 bag Kit Kat minis (you could also buy individual bars and chop them into uniform pieces)
1/2 cup creamy peanut butter (do not use natural or homemade peanut butter)
2 cup Rice Krispies cereal

Directions
Base
1. Line an 13 x 9 inch pan with aluminum foil leaving overhang, spray with cooking spray; set aside.
2. In a large microwave-safe bowl, combine peanut butter, corn syrup, sugars, and heat on high power for 1 minute to melt.
3. Stop to stir. Mixture will be on the granular side, this is okay.
4. Return bowl to microwave and heat for 1 more minute on high power.
5. Stir in the vanilla.
6. Stir in 6 cups cereal.
7. Turn mixture out into prepared pan, packing it down somewhat firmly with a spatula and smoothing the top; set pan aside.

Chocolate Topping
1. In a medium microwave-safe bowl, combine chocolate chips, peanut butter, and heat on high power for 1 minute to melt.
2. Stop to stir. Chips may not be completely melted. Return bowl to microwave and heat in 15-second bursts until chocolate can be stirred smooth, 15 seconds is likely all they’ll need.
3. Stir in 2 cups cereal.
4. Pour chocolate mixture over base, packing it down somewhat firmly with a spatula and smoothing the top.
5. Place the Kit Kats Minis in about 6 evenly and tightly spaced rows over the surface, with about 1/4-inch space between each piece (does not have to be perfect). By the time you get all the pieces on and in rows, the pieces you placed on first will likely have started to melt at the base. Push them down lightly so they embed into the chocolate-crispy layer. Go back over and push on all the pieces with your finger to ensure they’re all embedded and will stick as the bars cool and set up.
6. Cover pan with a sheet of foil (to prevent fridge smells), and place pan in fridge to set up for at least 2 to 3 hours, or overnight, or until chocolate layer is completely set before lifting out with foil overhang, slicing, and serving.

*Bars will keep airtight at room temperature for up to 1 week, in the refrigerator for up to 2 weeks, or in the freezer for up to 6 months.*

Kit Kat Crunch Bars


SUPER Easy Holiday Truffles: Mint & Smores

These truffles are an instant crowd pleaser at any holiday get together. I’ve neverbeenso thrilled to create an easy recipe to bring to parties that can be made ahead and easily distributed. They’re also a super easy no-bake dessert. They do take a little time to chill in between batches, but you can do other things in the mean time, and look how darn pretty they are!! Each batch only uses 5-6 ingredients! You could just make one flavor, but I’m a lover of chocolate mint AND smores, so I opt to make both! And now with all the new oreo flavors, you can really be creative!

These super easy truffles are an instant crowd pleaser at any holiday party! You can really get creative with the flavors, but I opt for chocolate mint and smores!

Crush your cookies in a food processor, or get any of that holiday stress out and crush them yourself!

SUPER Easy Holiday Truffles: Mint & Smores

SUPER Easy Holiday Truffles: Mint & Smores

Either way, just make sure they are finely finely crushed as below.

SUPER Easy Holiday Truffles: Mint & Smores

SUPER Easy Holiday Truffles: Mint & Smores

Next, add your softened cream cheese. I mixed this all up using my hands, it’s A LOT easier than trying to combine using a spoon.  Ultimately, you want it combined like so.

SUPER Easy Holiday Truffles: Mint & Smores

Make sure to give the filling adequate time to chill (at least an hour), so that it’s easier to roll into uniform balls. Then start your rolling!

SUPER Easy Holiday Truffles: Mint & Smores

Let these chill for at least 2 hours or overnight, so that they don’t fall apart as you dip them in the melting chocolate. I found that using tools, like these from Wilton, make the truffle dipping process SO much easier!

I topped the smores truffles with crushed graham crackers and drizzled red and white chocolate over the mint truffles!

SUPER Easy Holiday Truffles: Mint & Smores

I’ve included both recipes below! Enjoy!

Smores Truffles

  • Servings: 36
  • Difficulty: easy
  • Print

Ingredients
1 package Golden Oreos
1 (8 oz.) package cream cheese, softened
1 cup Kraft Jet-Puffed Mallow Bits
1 (16 oz.) package milk chocolate Candiquik
½ cup graham cracker crumbs

Directions
1. Using a food processor, crush Oreos into crumbs.
2. Using hands, combine crushed cookies, cream cheese, and marshmallow bits in a medium bowl.
3. Chill dough in the refrigerator for at least an hour to make easier for rolling.
4. Roll into 1-inch balls and place on cookie sheet lined with parchment paper.
5. Refrigerate until firm.
6. Remove from refrigerator and dip balls into melted Candiquik.
7. Sprinkle immediately with graham cracker crumbs.

Chocolate Mint Truffles

  • Servings: 36
  • Difficulty: easy
  • Print

Ingredients
1 package Mint Oreos
1 (8 oz.) package cream cheese, softened
1/2 teaspoon peppermint extract (optional, but gives more mint flavor)
1 (16 oz.) package white chocolate Candiquik
1/2 package red candy melts (found at Michael’s)
1/2 package green candy melts
Plastic squeeze bottles or plastic bag for drizzling

Directions
1. Using a food processor, crush Oreos into crumbs.
2. Using hands, combine crushed cookies, cream cheese, and peppermint extract in a medium bowl.
3. Chill dough in the refrigerator for at least an hour to make easier for rolling.
4. Roll into 1-inch balls and place on cookie sheet lined with parchment paper.
5. Refrigerate until firm.
6. Remove from refrigerator and dip balls into melted Candiquik. Let cool.
7. Once hardened, melt green candy melts and drizzle over truffles. Let cool.
8. Follow the same process with red candy melts.


Quick and Easy Chicken Noodle Soup

Quick & Easy Chicken Noodle Soup

The sicknesses are officially making their presence known around our house. We’ve been loading up on meds and tea, but finally today I decided this was a job for the chicken noodle soup tribe. However, the last thing I want to do when I’m sick is go to the grocery store, prep and stand in the kitchen all day cooking. Therefore, the only homemade chicken noodle soup I’ve ever made consisted of dumping canned soup into a bowl and heating it in the microwave (I know, I know).

This recipe is probably the quickest and easiest chicken noodle soup recipe you can get away with. I adapted the recipe from AverieCooks, making a few adjustments, and it turned out great!

It warmed our insides and was full of savory flavor. Here’s to hoping it also fights off this horrendous sickness so we can go on about our lives.

Using the rotisserie chicken was a HUGE time saver.

Sizzle Sizzle.

Quick and Easy Chicken Noodle Soup

  • Servings: 4-6
  • Difficulty: easy
  • Print

Ingredients
2 tablespoons olive oil
1.5 cup carrots, peeled and sliced thin (about 2 large carrots)
1.5 cup celery, sliced thin (about 3 stalks)
1 cup sweet Vidalia or yellow onion, peeled and diced small (about 1 medium onion)
4 garlic cloves, minced
80 ounces (10 cups) low-sodium chicken broth
2 bay leaves
1 teaspoon fresh thyme (or 1/2 teaspoon dried thyme)
1/2 teaspoon dried oregano
1 teaspoon pepper, or to taste
12 oz wide egg noodles (or your favorite noodles or pasta)
3 cups shredded cooked chicken (use storebought rotisserie chicken to save time; or cook your own)
3-4 tablespoons fresh parsley, finely chopped
1-2 tablespoons white wine vinegar
salt, to taste

Directions
1. To a large dutch oven, add the olive oil and heat over medium-high heat.
2. Add the carrots, celery, onion, and sauté for about 7 minutes, or until vegetables begin to soften. Stir intermittently.
3.  Add the garlic and sauté for another 1 to 2 minutes.
4. Add the chicken broth, bay leaves, thyme, oregano, pepper, and bring to a boil. Allow mixture to boil gently for about 5 minutes or until vegetables are fork-tender.
5. Add the egg noodles and boil mixture for about 10 minutes, or until noodles are soft and cooked through. At any time while making the soup, if the overall liquid level is lower than you like and you prefer more broth, adding a cup or two of water is okay. At the end you will adjust the salt level.
6. Add the chicken, parsley, white wine vinegar, and boil 1 to 2 minutes, or until chicken is warmed through. Taste soup and add salt to taste. I added about 1 tablespoon but this will vary based on how salty the brand of chicken broth used is, how salty the rotisserie chicken is, and personal preference. Make any necessary seasoning adjustments (i.e. more salt, pepper, herbs, etc.), remove the bay leaves, and serve immediately.

Soup will keep airtight in the fridge for 5 to 7 days or in the freezer for up to 6 months.

Stuffing Stuffed Acorn Squash

Let me start out by saying I am NOT a fan of leftovers. AT ALL. However, somehow we always end up with mounds of them in our refrigerator (thanks, Mom). In the past, we’ve been really bad with not making the most of our leftovers, so this year I decided to change that up. By adding simple ingredients, leftovers can save a ton of time and money and not taste half bad.

My mom made some STELLAR stuffing this year, full of sausage and cranberries. Per my request, I was sent home with her stuffing leftovers after Thanksgiving; however,  I wasn’t all too enthused to eat it popped into the microwave on its own. So I stopped and picked up a few acorn squash (I had never cooked with them before!) and some sage, not exactly sure what I’d do with them. First thought: stuff the squash, of course, and what better to stuff it with then….(you guessed it) STUFFING! The rest of the ingredients were already in my pantry, so this made for a very cheap and tasty winter meal.

Aren’t they so pretty?!

Stuffing Stuffed Acorn Squash

Stuffing Stuffed Acorn Squash

Stuffing Stuffed Acorn Squash

If you don’t have stuffing leftovers just lying around, and you think this recipe sounds way too delicious to pass up, just go ahead and make a batch of stuffing (I included my mom’s recipe below) and use it throughout the week for other meals!

Here ya go, two recipes for the price of one!

Stuffing Stuffed Acorn Squash

  • Servings: 2-4
  • Difficulty: easy
  • Print

Ingredients
2 acorn squash
2 tablespoons olive oil
2 tablespoons butter
2 tablespoons sage, minced
2 cups leftover stuffing (I used my Mom’s cranberry sausage stuffing recipe below, but you can use your favorite)
¼ cup panko breadcrumbs

Directions
1. Preheat the oven to 350 degrees F.
2. Cut the acorn squash in half, scoop out the seeds. Tip: Cut the tip of the top portion so that the squash sits easily on both sides (you will be cooking face up and face down).
3. Add the olive oil in the middle of the open halves and use a pastry brush to coat the edges.
4. Place the squash halves open side down on a baking sheet and bake for 15-20 minutes.
5. Flip the squash over and run a fork through the middle making strings. Add a little butter and top with leftover stuffing (can be right out of the fridge).
6. Bake for another 20 minutes. Remove from the oven and spray with cooking spray and top each half with panko breadcrumbs. Bake for another 15 minutes or until squash is tender and the stuffing is hot.
7. When done, top with sage and serve.

**Again, I used leftover stuffing for this recipe. If you don’t have a favorite stuffing recipe, I’ve included the very tasty Cranberry Sausage Stuffing recipe that I used below**

Cranberry Sausage Stuffing

  • Servings: 8
  • Difficulty: easy
  • Print

Ingredients
16 oz Jimmy Dean sausage
½ cup butter
6 stalks celery, finely diced
2 medium onions, finely diced
12 oz package cornbread stuffing (stove top)
1 cup dried cranberries
1 tsp salt
2 cans (14.5 oz) chicken broth

Directions
1. Preheat oven to 325 degrees F.
2. In large skillet, crumble and cook sausage until browned. Remove from pan.
3. In the same skillet, melt the butter over medium heat and saute the celery and onion until soft, about 5 minutes.
4. In a large bowl combine celery, onion, sausage, stuffing mix, cranberries, and salt. Add broth and stir until well mixed. Bake in casserole dish, covered for 1 hour at 325 degrees F or until hot.
5. Refrigerate up to 4 days in air tight container until ready to use.