Golf Ball Cake Pops for Father’s Day 

Father’s Day is coming and you know what that means, you get to celebrate the wonderful men in your life, especially your dad (aka the hardest person to shop for)!

If your dad is an avid sportsman like mine, over the years you’ve probably exhausted him with every ounce of paraphernalia of every single one of his sports team’s and any type of sports equipment you could get your hands on. I’ve also gone the route of bringing him things to eat and drink (dad loves a cold beer). This year I took it to a new level and combined both of the ideas I’ve been using for the last 28 years!

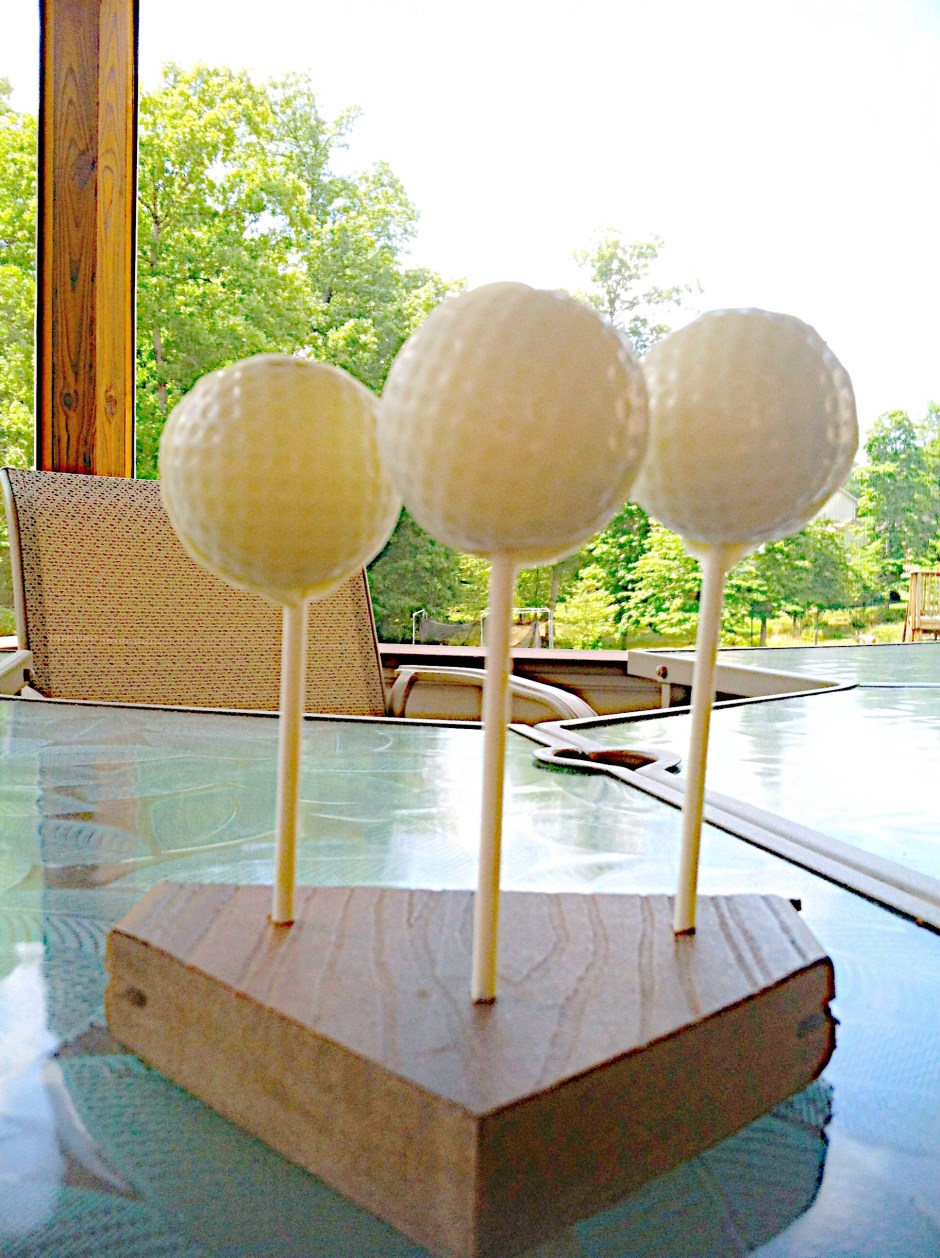
I give you golf ball cake pops!

Really any sport will do, as long as you find the mold online and Amazon has an awesome selection. I used these molds (for the balls) and sticks (for the tees) and they worked perfectly!


I tried a couple different cake recipes. I really wanted to somehow incorporate beer, but all of the cake recipes I found that included beer were basically inedible, IMO. Including a very basic cake pop recipe below.

One Little Project has a ton of different cake pop flavor variations.

Here are some tips for coating cake pops that I’ve found helpful.

Once your cake pops are beautiful. Grab an old slab of wood, drill a few holes and you’ve got the perfect presentation of tees on a course! [I’ve also found this is a great way to dry your cake pops].

Golf Ball Cake Pops

  • Servings: 24
  • Difficulty: moderate
  • Print

Ingredients
1 box white cake mix (and ingredients called for on the box)
1 jar white frosting
1 package Candiquik melting chocolate (or any other variation that works for you, but I swear by Candiquik) + 2 tablespoons of white chocolate
Cake pop molds and sticks

Directions
1. Prepare cake (9×13 or 2 rounds) as directed and let cool.
2. Add cake to bowl and crumble until it resembles fine crumbs.
3. Using your hands to incorporate, add frosting a little bit at a time until cake can be formed into a ball, yet slightly crumbly.
4. Freeze your balls for 20 minutes.
5. Melt the 2 TBSP of white chocolate and dip sticks into chocolate and into balls, place back in the freezer for 20 mins.
6. Melt the Candiquik according to directions and then cover each cake pop with the melted chocolate and place into the mold.
7. Let them harden for 10 minutes or so and place on your stand!

Oreo Stuffed Churro Cupcakes

HAPPY CINCO DE MAYO!! This is one of my favorite holidays to celebrate. Tacos, margaritas, tequila, guac; what else do you need? As I was sitting at work today, I couldn’t help but crave churros and wanted to share that craving with my co-workers. However, I was a little late to the game in preparation and decided to think up something quick and easy in my head that I could prep tonight and bring in tomorrow (or this weekend, if I became too lazy).

For the sake of time, I decided to enhance store-bought mix and icing. I figured I could just throw some cinnamon in the batter and call it a day, UNTIL I spotted cinnamon bun oreos! So, I decided to stuff my cupcakes with the oreos and add a little crunchy layer underneath the icing to give them a churro-esque texture.

Alas, Oreo Stuffed Churro Cupcakes. Now, if you don’t have time to whip these up before tomorrow’s festivities, why not expand your Cinco Celebration throughout the weekend?? Or make them just because; they’re that good (AND EASY)!

Oreo Stuffed Churro Cupcakes

Oreo Stuffed Churro Cupcakes

Oreo Stuffed Churro Cupcakes

Oreo Stuffed Churro Cupcakes

Oreo Stuffed Churro Cupcakes

Oreo Stuffed Churro Cupcakes

Oreo Stuffed Churro Cupcakes

Oreo Stuffed Churro Cupcakes

Oreo Stuffed Churro Cupcakes

Oreo Stuffed Churro Cupcakes

  • Servings: 24
  • Difficulty: easy
  • Print

Ingredients
1 box white cake mix (and the ingredients called for on the box)
2 jars cream cheese icing
1 package cinnamon bun oreos (or golden if you can’t find these – and add ground cinnamon)
4 tablespoons of butter, melted
1/4 cup granulated sugar
1 TSP ground cinnamon
Cupcake liners (since these were for Cinco De Mayo, I used red, green and white)
Decorative pieces (found these edible mustaches at Party City)

Directions
1.  Mix cake batter according to box directions. 
2.  Line your muffin tins and pour 1 tbsp batter into each liner and then place one oreo into each liner and push down (the batter should hug the oreo, but not cover). Then place 1-2 tbsp more batter into each liner until they are 3/4 full.  
3.  Bake according to box directions (mine were perfect in 17 mins).
4. Move the cupcakes to a wire rack and cool completely.
5. Once cooled completely, mix granulated sugar and ground cinnamon in a bowl. Brush melted butter on the tops of each cupcake and then dip into cinnamon sugar mixture.
6. Top with cream cheese frosting and decorative pieces.
7. Refrigerate until ready to serve. Set out 20 mins prior to serving.

5 Minute S’mores Mug Cake

I have a major sweet tooth and I love to bake. Normally these two go hand in hand. However, sometimes I’m lazy. I need that sweet tooth fix without all the work. Insert: individual mug desserts. I have neverbeenso obsessed with these cute little desserts for one. Mug desserts have been around for some time, so I’m not reinventing the wheel here, but this S’mores Mug Cake is to die for. I had everything in my pantry and it took all of 5 minutes from start to devour. You won’t be sorry.

As I mention below, this recipe uses Kraft Jetpuffed Marshmallow Crème, but if you don’t have that, any Kraft marshmallow product (Mallowbits, mini marshmallows etc) will do.

5 Minute S'mores Mug Cake

5 Minute S’mores Mug Cake

  • Servings: 1
  • Difficulty: super easy
  • Print

Ingredients
2 T. butter, melted
¼ cup graham cracker crumbs
2 T. brown sugar, packed
½ T. granulated sugar
¼ cup milk
¼ cup + 1 T. all-purpose flour
¼ tsp. baking powder
dash of ground cinnamon
2 T. Kraft Jetpuffed Marshmallow Crème
2 T. chocolate chips
1 T. Kraft Jetpuffed Marshmallow Creme, for garnish
Chocolate syrup, for garnish

Directions
1. In a mug, add in the butter, graham cracker crumbs, brown and granulated sugar. Stir to combine.
2.  Add in the milk and stir until combined.
3.  Add in the flour, baking powder and ground cinnamon. Stir until combined and smooth.
4. Stir in the Jetpuffed and chocolate chips. Note: If you don’t have Jetpuffed Marshmallow Creme, Mallowbits or regular mini marshmallows would work.
5. Place in the microwave. Heat for 1 minute and 35 seconds.
6. Place remaining Jetpuffed on top of cake. Drizzle with chocolate syrup.
7. Let cool slightly and eat.


SUPER Easy Holiday Truffles: Mint & Smores

These truffles are an instant crowd pleaser at any holiday get together. I’ve neverbeenso thrilled to create an easy recipe to bring to parties that can be made ahead and easily distributed. They’re also a super easy no-bake dessert. They do take a little time to chill in between batches, but you can do other things in the mean time, and look how darn pretty they are!! Each batch only uses 5-6 ingredients! You could just make one flavor, but I’m a lover of chocolate mint AND smores, so I opt to make both! And now with all the new oreo flavors, you can really be creative!

These super easy truffles are an instant crowd pleaser at any holiday party! You can really get creative with the flavors, but I opt for chocolate mint and smores!

Crush your cookies in a food processor, or get any of that holiday stress out and crush them yourself!

SUPER Easy Holiday Truffles: Mint & Smores

SUPER Easy Holiday Truffles: Mint & Smores

Either way, just make sure they are finely finely crushed as below.

SUPER Easy Holiday Truffles: Mint & Smores

SUPER Easy Holiday Truffles: Mint & Smores

Next, add your softened cream cheese. I mixed this all up using my hands, it’s A LOT easier than trying to combine using a spoon.  Ultimately, you want it combined like so.

SUPER Easy Holiday Truffles: Mint & Smores

Make sure to give the filling adequate time to chill (at least an hour), so that it’s easier to roll into uniform balls. Then start your rolling!

SUPER Easy Holiday Truffles: Mint & Smores

Let these chill for at least 2 hours or overnight, so that they don’t fall apart as you dip them in the melting chocolate. I found that using tools, like these from Wilton, make the truffle dipping process SO much easier!

I topped the smores truffles with crushed graham crackers and drizzled red and white chocolate over the mint truffles!

SUPER Easy Holiday Truffles: Mint & Smores

I’ve included both recipes below! Enjoy!

Smores Truffles

  • Servings: 36
  • Difficulty: easy
  • Print

Ingredients
1 package Golden Oreos
1 (8 oz.) package cream cheese, softened
1 cup Kraft Jet-Puffed Mallow Bits
1 (16 oz.) package milk chocolate Candiquik
½ cup graham cracker crumbs

Directions
1. Using a food processor, crush Oreos into crumbs.
2. Using hands, combine crushed cookies, cream cheese, and marshmallow bits in a medium bowl.
3. Chill dough in the refrigerator for at least an hour to make easier for rolling.
4. Roll into 1-inch balls and place on cookie sheet lined with parchment paper.
5. Refrigerate until firm.
6. Remove from refrigerator and dip balls into melted Candiquik.
7. Sprinkle immediately with graham cracker crumbs.

Chocolate Mint Truffles

  • Servings: 36
  • Difficulty: easy
  • Print

Ingredients
1 package Mint Oreos
1 (8 oz.) package cream cheese, softened
1/2 teaspoon peppermint extract (optional, but gives more mint flavor)
1 (16 oz.) package white chocolate Candiquik
1/2 package red candy melts (found at Michael’s)
1/2 package green candy melts
Plastic squeeze bottles or plastic bag for drizzling

Directions
1. Using a food processor, crush Oreos into crumbs.
2. Using hands, combine crushed cookies, cream cheese, and peppermint extract in a medium bowl.
3. Chill dough in the refrigerator for at least an hour to make easier for rolling.
4. Roll into 1-inch balls and place on cookie sheet lined with parchment paper.
5. Refrigerate until firm.
6. Remove from refrigerator and dip balls into melted Candiquik. Let cool.
7. Once hardened, melt green candy melts and drizzle over truffles. Let cool.
8. Follow the same process with red candy melts.


Healthy Deep Dish Cookie Pie

Will this rain ever stop?! It’s been two full days of nothing but RAIN. And what’s worse is by the time I get home it’s dark, so there really is no getting me to do anything productive after work. All I want to do is Netflix & NOM.

This deep dish cookie allowed me to do just that and not feel totally bad about it. It’s so decadent and chocolatey and warm and even SOMEWHAT healthy! I was a bit skeptical when trying out this recipe from Chocolate Covered Katie because one of the main ingredients is beans. I’ve done the whole bean thing before and it was not a pleasant result, but Katie knows what she’s doing. NEVERBEENSO delicious!

Healthy Deep Dish Cookie Pie

Chocolate Covered Katie

Healthy Deep Dish Cookie Pie

  • Servings: 6
  • Difficulty: easy
  • Print

Ingredients
2 cans white beans or garbanzos (drained and rinsed) (500g total, once drained)
1 cup quick oats
1/4 cup unsweetened applesauce
3 tbsp oil (canola, veg, or coconut)
2 tsp pure vanilla extract
1/2 tsp baking soda
2 tsp baking powder
1/2 tsp salt
1 1/2 cups brown sugar
1 cup chocolate chips

Directions
1. Preheat the oven to 350 degrees F.
2. Blend everything (except the chips) very well in a good food processor (not a blender).
3. Mix in chips, and pour into an oiled pan (I used a 10-inch spring-form pan, but you can use a smaller pan if you want a really deep-dish pie.)
4. Bake for around 35-40 minutes. Let stand at least 10 minutes before removing from the pan.
5. Pair with milk and indulge!

Mexican Chocolate Pecan Pie 


Need I say more here? Probably not, but I will..

HAPPY THANKSGIVING EVERYONE! Every Thanksgiving I try a different rendition of a pecan pie. Last year it was whiskey pecan pie, but let’s just say whiskey-1, me-0.

This year I was inspired by Chef Marcela’s Mexican Chocolate Pecan Pie. This recipe only takes up your oven for 10 minutes and on Thanksgiving that’s about all I have between everything else. There were some conflicting reviews posted on Marcela’s recipe, so I decided to change it up a bit when it came to a few ingredients.

The Perfect Pie Crust  

This is the Mexican chocolate I ended up finding. Wasn’t the brand the recipe recommended, but I found it at Whole Foods and ended up mixing in some milk chocolate and cinnamon.

Mexican Chocolate

  Mexican Chocolate Pecan Pie

Mexican Chocolate Pecan Pie

  • Servings: 6
  • Difficulty: easy
  • Print

Ingredients

Crust
Nonstick cooking spray, for pie dish
1.5 cups graham cracker crumbs
7 tablespoons unsalted butter, melted
2 tablespoons packed light brown sugar

Filling
12 tablespoons unsalted butter
½ cup packed light brown sugar
6 tablespoons light corn syrup
3 cups pecan halves (about 10 oz)
1/4 cup whipping cream
2 oz Mexican chocolate (I used Taza Chocolate – found at Whole Foods), finely minced
1 oz milk chocolate, finely minced
2 teaspoons cinnamon

Directions

Crust
1. Spray a 9-inch pie dish with cooking spray.
2. Blend the graham cracker crumbs, melted butter and light brown sugar together in a medium bowl by hand.
3. When well combined, press the crumb mixture into the bottom and up the sides of the prepared pie dish. Cover the crust and freeze while preparing the filling. (Can be prepared 1 week ahead and kept frozen).

Preheat the oven to 350 degrees F.

Filling
1. Combine the butter, brown sugar and corn syrup in medium saucepan. Bring to boil, stirring often. Boil 1 minute.
2. Stir in the pecans and whipping cream. Boil until the mixture thickens slightly, about 5 minutes. Remove from the heat.
3. Add the chocolate, cinnamon and stir until the chocolate melts and the mixture is well blended.

Pour the filling into the crust. Using a spoon, evenly distribute the nuts. Bake until the filling bubbles all over, about 10 minutes. Transfer the pie to a rack and cool completely.